Plugins Guide
This plugins guide covers the available plugins (defining digital asset types) for the Business API Ecosystem v7.6.0
Installing Asset Plugins
The Business API Ecosystem is intended to support the monetization of different kind of digital assets. The different kind of assets that may be wanted to be monetized will be heterogeneous and potentially very different between them.
Additionally, for each type of asset different validations and activation mechanisms will be required. For example, if the asset is a CKAN dataset, it will be required to validate that the provider is the owner of the dataset. Moreover, when a customer acquires the dataset, it will be required to notify CKAN that a new user has access to it.
The huge differences between the different types of assets that can be monetized in the Business API Ecosystem makes impossible to include its validations and characteristics as part of the core software. For this reason, it has been created a plugin based solution, where all the characteristics of an asset type are implemented in a plugin that can be loaded in the Business API Ecosystem.
To include an asset plugin execute the following command in the Charging Backend:
$ ./manage.py loadplugin ckandataset.zip
It is possible to list the existing plugins with the following command:
$ ./manage.py listplugins
To remove an asset plugin, execute the following command providing the plugin id given by the listplugins command
$ ./manage.py removeplugin ckan-dataset
Note
For specific details on how to create a plugin and its internal structure, have a look at the Business API Ecosystem Programmer Guide
At the time of writing, the following plugins are available:
- Basic File: Allows the creation of products by providing files as digital assets. No validations or processing is done
- Basic URL: Allows the creation of products by providing URLs as digital assets. No validations or processing is done
- CKAN Dataset : Allows the monetization of CKAN datasets
- CKAN API Dataset Allows the monetization of CKAN datasets whose resources are served by an external APIs (e.g NGSI Queries) secured with API Umbrella.
- Umbrella Service Allows the monetization of services secured by API Umbrella with FIWARE IDM users and roles.
- WireCloud Component: Allows the monetization of WireCloud components, including Widgets, operators, and mashups
- Accountable Service : Allows the monetization of services protected by the Accounting Proxy, including Orion Context Broker queries
Available Plugins
Basic File and Basic URL
The Basic File and Basic URL plugins are available at GitHub These plugins are intended to enable the creation of digital products in the Business API Ecosystem without the need of specifying a particular type or validation process. In this regard, these plugins allow the publication of any file or any URL as digital asset respectively, and can be used for the creation of simple file catalogs or for testing the Business API Ecosystem.
These plugins do not implement any event handler.
CKAN Dataset and CKAN API Dataset
The CKAN Dataset and CKAN API Dataset plugins are available in GitHub. These plugins define an asset type intended to manage and monetize datasets offered in a CKAN instance. In particular, these plugins are able to validate the dataset, validate the rights of the seller creating a product specification to sell the provided dataset, and manage the access to the dataset of those customers who acquire it.
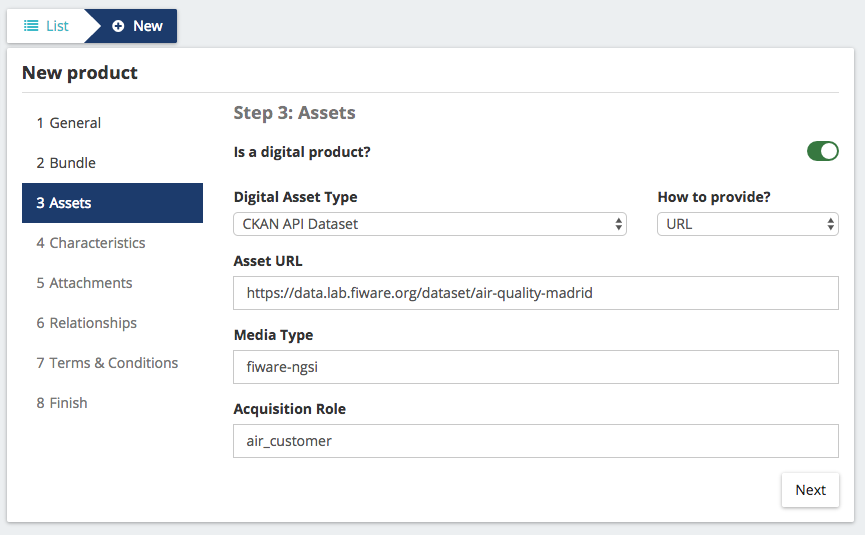
The difference between both plugins is the type of data included as a resource in the CKAN dataset. In particular, CKAN API Dataset expects the data to be served by an external API secured with the FIWARE security framework. In this regard, the CKAN API Dataset also validates the permissions of the seller in the data service and grants customers access to it using the FIWARE IdM roles and permissions.
Is important to notice that by default CKAN does not provide a mechanism to publish protected datasets or an API for managing the access rights to the published datasets. In this regard, the CKAN instance to be monetized has to be extended with the following CKAN plugins:
- ckanext-oauth2: This extension allows to use an external OAuth2 Identity Manager for managing CKAN users. In particular, this extension must be used, in this context, to authenticate users using the same FIWARE IdM instance as the specific Business API Ecosystem instance, so both systems (CKAN and Business API Ecosystem) share their users.
- ckanext-privatedatasets: This extension allows to create protected datasets in CKAN which can only be accessed by a set of users selected by the dataset owner. Moreover, this extension exposes an API that can be used to add or remove authorized users from a dataset.
In addition, if the ckanext-storepublisher plugin is installed in CKAN, the CKAN dataset or CKAN API Dataset plugin must be installed in the Business API Ecosystem, since the aforementioned CKAN extension uses the CKAN Dataset or CKAN API Dataset asset type (depending on the dataset resource) for creating product specifications.
The CKAN Dataset plugin only allows to provide the asset with a URL that must match the dataset URL in CKAN.
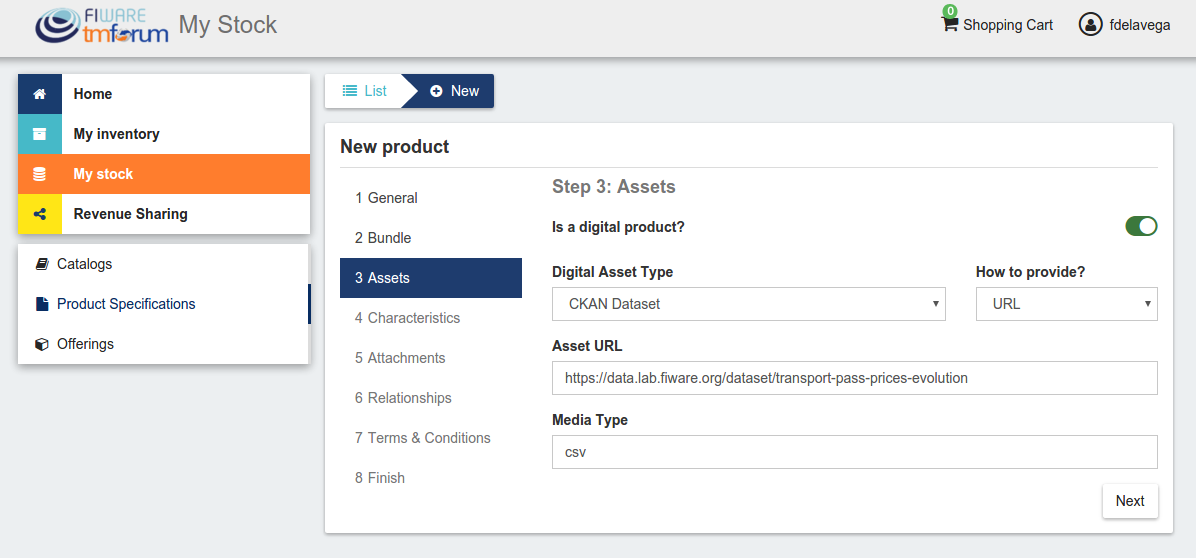
This plugin implements the following event handlers:
- on_pre_product_spec_validation: In this handler the plugin validates that the provided URL is a valid CKAN dataset and that the user creating the product specification is its owner.
- on_product_acquisition: In this handler the plugin uses the CKAN instance API in order to grant access to the user who has acquired a dataset.
- on_product_suspension: In this handler the plugin uses the CKAN instance API in order to revoke access to a dataset when a user has not paid or when the user cancels a subscription.
On the other hand, the CKAN API Dataset also requires an Acquisition role to be provided. This role is the one that will be granted to customers in the IdM in order to enable their access to the backend service, so the role must exist and define a proper set of permissions for accessing the data.
This plugins implements the following event handlers:
- on_pre_product_spec_validation: In this handler the plugin validates that the provided URL is a valid CKAN dataset and that the user creating the product specification is its owner.
- on_post_product_spec_validation: In this handler, the plugin validates that the API resources included in the CKAN dataset are valid, the permissions of the seller to offer that services, and that the provided acquisition role exist and is valid.
- on_post_product_offering_validation: In this handler the plugin validates that pricing models are supported when creating a pay-per-use offering
- on_product_acquisition: In this handler the plugin uses the CKAN instance API in order to grant access to the user who has acquired a dataset.
- on_product_suspension: In this handler the plugin uses the CKAN instance API in order to revoke access to a dataset when a user has not paid or when the user cancels a subscription.
- get_pending_accounting: In this handler, the plugins retrieves pending accounting information when the access to the data has been acquired under a pay-per-use pricing model.
In addition, the CKAN API Dataset requires some settings to be configured before being deployed. This settings are available in the setting.py file, and are:
- UMBRELLA_SERVER: Administration endpoint of the API Umbrella instanceused to sercure backend services
- UMBRELLA_KEY: API Key used for accessing to the API Umbrella instance used to secure the backend service
- UMBRELLA_ADMIN_TOKEN: Admin token used for accessing to the API Umbrella instance used to secure the backend service
- KEYSTONE_USER: Keystone user used for authenticate requests to the FIWARE IdM
- KEYSTONE_PASSWORD: Keystone password used for authenticate requests to the FIWARE IdM
- KEYSTONE_HOST: Host of the Keystone service of the FIWARE IdM used for authorizing customers
- IS_LEGACY_IDM: False if the FIWARE Idm is at least v7.0.0
- CKAN_TOKEN_TYPE: Whether CKAN has to be accessed using X-Auth-Token or Authorization headers
In addition, these settings can be configured using environment variables:
- BAE_ASSET_UMBRELLA_SERVER
- BAE_ASSET_UMBRELLA_KEY
- BAE_ASSET_UMBRELLA_TOKEN
- BAE_ASSET_IDM_USER
- BAE_ASSET_IDM_PASSWORD
- BAE_ASSET_IDM_HOST
- BAE_ASSET_LEGACY_IDM
- BAE_ASSET_TOKEN_TYPE
Umbrella Service
The Umbrella Service plugin is available in GitHub. This plugin deines an asset type intended to manage and monetize any HTTP service secured with the combination of a FIWARE IDM for users and roles management and API Umbrella as PEP proxy.
The Umbrella Service plugin allows to provide services in different ways using the options it defined in its metadata form, which can be selected by sellers when registering the product. In particular:
- Authorization Method: Whether user access to backend service is controlled using FIWARE IDM roles or API Umbrella native roles
- Acquisition Role: Role to be granted to customers
- Access to sub-paths allowed: If true, customers will be able to access to any sub-path of the monetized service
- Additional query strings allowed: If true, customers will be able to call the service with different query strings as the included in the asset URL
- Admin API Key: API key to be used by the BAE to access to the API Umbrella admin API
- Admin Auth Token: Admin token to be used by the BAE to access to the Umbrella admin API
Moreover, this plugin support pay-per-use pricing supporting the api call unit. The accounting information is retrieved from the API Umbrella logging API using the service details provided as metadata when the product is created.
This plugin implements the following event handlers:
- on_post_product_spec_validation: In this event handler the plugin validates all the provided information, including URL, Umbrella credentials and role.
- on_post_product_offering_validation: In this event handler the plugin validates that the provided procing model is supported by the plugin (Usage model)
- on_product_acquisition: In this event handler the plugin grants access to the customer using the provided role
- on_product_suspension: In this event handler the plugin revokes access to the customer removing the provided role
- get_pending_accounting: In this event handler the plugin accesses Umbrella API to retrieve the pending accounting information
WireCloud Component
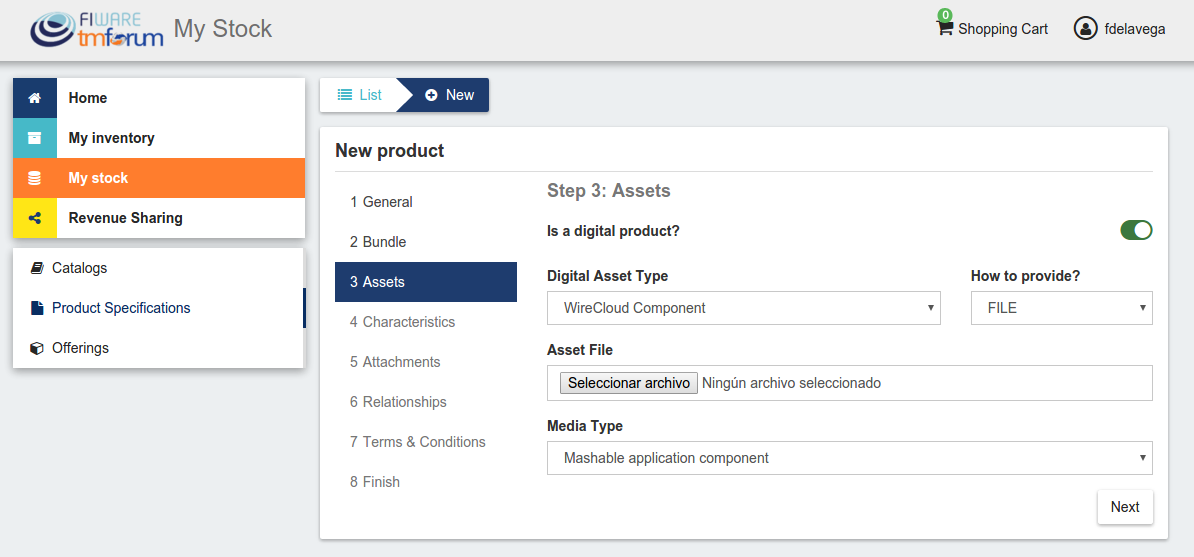
The WireCloud Component plugin is available in GitHub. This plugin defines an asset type intended to manage and monetize the different WireCloud components (Widgets, Operators, and Mashups) in particular by enabling the creation of product specifications providing the WGT file of the specific component. (For more details on the WireCloud platform see its documentation in ReadTheDocs)
The WireCloud component plugin allows to provide the WGT file in the two ways supported by the Business API Ecosystem, that is, uploading the WGT file when creating the product and providing a URL where the platform can download the file.
In addition, the plugin only allows the media type Mashable application component. Nevertheless, the plugin code uses the WGT metainfo to determine the type of the WireCloud component (Widget, Operator, or Mashup) and overrides the media type with the proper one understood by the WireCloud platform (wirecloud/widget, wirecloud/operator or wirecloud/mashup).

This plugin implements the following event handlers:
- on_post_product_spec_validation: In this handler the plugin validates the WGT file to ensure that it is a valid WireCloud Component
- on_post_product_spec_attachment: In this handler the plugin determines the media type of the WGT file and overrides the media type value in the specific product specification
Accountable Service
Warning
This plugin is deprecated, and will not evolve. This plugin has been replaced by Umbrella Service Plugin
The Accountable Service plugin is available in GitHub. This plugin defines a generic asset type which is used jointly with the Accounting Proxy in order to offer services under a pay-per-use model. In particular, this plugin is able to validate services URLs, validate sellers permissions, generate API keys for the Accounting Proxy, validate offering pricing models, and manage customers access rights to the offered services.
Taking into account that this plugin is intended tyo work coordinately with an instance of the Accounting Proxy, all the assets to be registered using the Accountable Service type must be registered in the proxy as described in the Accounting Proxy section.
The Accountable Service plugin only allows to provide the assets with a URL that must match the service one.

This plugin implements the following event handlers:
- on_post_product_spec_validation: In this event handler the plugin validates that the provided URL belongs to a valid service registered in an instance of the Accounting Proxy, and that the user creating the product specification is its owner. In addition, this handler generates an API key for the Accounting Proxy to be used when it feeds the Business API Ecosystem with accounting information.
- on_post_product_offering_validation: In this event handler the plugin validates the pricing model of a product offering where the service is going to be sold. Specifically, it validates that all the price plans which can be selected by a customer are usage models and that the units (calls, seconds, mb, etc) are supported by the Accounting Proxy.
- on_product_acquisition: This event handler is used to grant access to a user who has acquired a service by sending a notification to the proxy, including also the unit to be accounted (price plan selected).
- on_product_suspension: This event handler is used to in order to revoke access to a service when a user has not paid or when the user cancels a subscription.
Accounting Proxy
The Accounting Proxy can be found in GitHub. This software is a NodeJs server intended to manage services offered in the Business API Ecosystem. In particular, it is able to authenticate users, authorize or deny users to access to a particular service depending on the acquisition, the URL, or the HTTP method used, and account the usage made of the service so users can be charged on pay-per-use basis.
Having this software deployed allows service owners to protect their services and offer them in the Business API Ecosystem without the need of making any modification in the specific service.
Installation
This software is a pure NodeJS server, to install basic dependencies execute the following command:
$ npm install
Configuration
All the Accounting Proxy configuration is saved in the config.js file in the root of the project.
In order to have the accounting proxy running it is needed to fill the following information:
- config.accounting_proxy: Basic information of the accounting deployment.
- https: set this variable to undefined to start the service over HTTP.
- enabled: set this option to true to start the service over HTTPS and activate the certificate validation for some administration requests (see Proxy API).
- certFile: path to the server certificate in PEM format.
- keyFile: path to the private key of the server.
- caFile: path to the CA file.
- port: port where the accounting proxy server is listening.
{
    https: {
        enabled: true,
        certFile: 'ssl/server1.pem',
        keyFile: 'ssl/server1.key',
        caFile: 'ssl/fake_ca.pem'
    },
    port: 9000
}
- config.database: Database configuration used by the proxy.
- type: database type. Two possible options: ./db (sqlite database) or ./db_Redis (redis database).
- name: database name. If the database type select is redis, then this field selects the database number (0 to 14; 15 is reserved for testing).
- redis_host: redis database host.
- redis_port: redis database port.
{
    type: './db',
    name: 'accountingDB.sqlite',
    redis_host: 'localhost',
    redis_port: 6379
}
- config.modules: An array of supported accounting modules for accounting in different ways. Possible options are:
- call: the accounting is incremented in one unit each time the user send a request.
- megabyte: counts the response amount of data (in megabytes).
- millisecond: counts the request duration (in milliseconds).
{
    accounting: [ 'call', 'megabyte', 'millisecond']
}
Other accounting modules can be implemented and included to the proxy (see Accounting modules).
- config.usageAPI: the information of the usage management API where the usage specifications and the accounting information will be sent.
- *host: Business API Ecosystem host. * port: Business API Ecosystem port. * path: path of the usage management API. * schedule: defines the daemon service schedule to notify the accounting information to the Business API Ecosystem. The format is similar to the cron tab format: “MINUTE HOUR DAY_OF_MONTH MONTH_OF_YEAR DAY_OF_WEEK YEAR (optional)”. By the default, the usage notifications will be sent every day at 00:00.
{
    host: 'localhost',
    port: 8080,
    path: '/DSUsageManagement/api/usageManagement/v2',
    schedule: '00 00 * * *'
}
- config.api.administration_paths: configuration of the administration paths. Default accounting paths are:
{
    api: {
        administration_paths: {
            keys: '/accounting_proxy/keys',
            units: '/accounting_proxy/units',
            newBuy: '/accounting_proxy/newBuy',
            checkURL: '/accounting_proxy/urls',
            deleteBuy: '/accounting_proxy/deleteBuy'
        }
    }
}
The Accounting Proxy can be used to proxy an Orion Context Broker, supporting the accounting of subscriptions. To do that, the following configuration params are used:
- config.resources: configuration of the resources accounted by the proxy.
- contextBroker: set this option to true if the resource accounted is an Orion Context Broker. Otherwise set this option to false (default value).
- notification_port: port where the accounting proxy is listening to subscription notifications from the Orion Context Broker (port 9002 by default).
{
        contextBroker: true,
        notification_port: 9002
}
Administration
The Accounting Proxy is able to manage multiple services. In this regard, it has been provided a cli tool that can be used by admins in order to register, delete, and manage its services. The available commands are:
./cli addService [-c | –context-broker] <publicPath> <url> <appId> <httpMethod> [otherHttpMethods…]: This command is used to register a new service in the Accounting Proxy. It receives the following parameters
- publicPath: Path where the service will be made available to external users. There are two valid patterns for the public path: (1) Providing a path with a single component (/publicpath) will make the Accounting Proxy accept requests to sub-paths of the specified one (i.e having a public path /publicpath requests to /publicpath/more/path are accepted). This pattern is typically used when you are offering the access to an API with multiple resources. (2) Providing a complete path (/this/is/the/final/resource/path?color=Blue&shape=rectangular) will make the Accounting Proxy to accept only requests to the exact registered path including query strings. This pattern is typically used when you are offering a single URL, like a Context Broker query.
- url: URL where your service is actually running and where requests to the proxy will be redirected. Note that in this case all the URL is provided (including the host) since the accounting proxy allows the management of services running in different servers.
- appId: ID of the service given by the FIWARE IdM. This id is used in order to ensure that the access tokens provided by users are valid for the accessed service
- HTTP methods: List of HTTP methods that are allowed to access to the registered service
- Options:
- -c, –context-broker: the service is an Orion Context broker service (config.contextBroker must be set to true in config.js).
Following you can find two examples in order to clarify the options available for registering a service:
$ ./cli addService /apacheapp http://localhost:5000/ 1111 GET PUT POST
In this case, there is a service running in the port 5000 which is made available though the /apacheapp path, allowing only GET, PUT, and POST HTTP request. Supposing that the Accounting Proxy is running in the host accounting.proxy.com in the port 8000, the following requests will be accepted by it:
GET http://accounting.proxy.com:8000/apacheapp
GET http://accounting.proxy.com:8000/apacheapp/resource1/
POST http://accounting.proxy.com:8000/apacheapp/resource1/resource2
Note
The Accounting Proxy does not care about the API or the semantics of the monitored service, so it may accept a request to a URL which does not exists in the service, resulting in a usual 404 error given by the later
Additionally, a complete path can be provided, as in the following example:
$ ./cli addService /broker/v1/contextEntities/Room2/attributes/temperature http://localhost:1026/v1/contextEntities/Room2/attributes/temperature 1111 GET
In this example, there is a Context Broker running in the port 1026 and a specific query is made available through the Accounting proxy, so only the following request is accepted:
GET http://accounting.proxy.com:8000/broker/v1/contextEntities/Room2/attributes/temperature
Note
For making the proxy transparent to final users is a good practice to use the same path in the external path and in the URL when providing a complete path. Nevertheless, this is not mandatory, so it is possible to create an alias for a query (i.e /room2/temperature for the previous example)
./cli getService [-p <publicPath>]: This command is used to retrieve the URL, the application ID and the type (Context Broker or not) of all registered services.
- Options:
- -p, –publicPath <path>: only displays the information of the specified service.
./cli deleteService <publicPath>: This command is used to delete the service associated with the public path.
./cli addAdmin <userId>: This command is used to add a new administrator.
./cli deleteAdmin <userId>: This command is used to delete the specified admin.
./cli bindAdmin <userId> <publicPath>: This command is used to add the specified administrator to the service specified by the public path.
./cli unbindAdmin <userId> <publicPath>: This command is used to delete the specified administrator for the specified service by its public path.
./cli getAdmins <publicPath>: This command is used to display all the administrators for the specified service.
To display a brief description of the cli tool you can use : ./cli -h or ./cli –help. In addition, to get information for a specific command you can use: ./cli help [cmd].
Authentication and Authorization
The Accounting Proxy relies on the FIWARE IdM for authenticating users. To do that, the proxy expects that all the requests include a header Authorization: Bearer access_token or X-Auth-Token: access_token with a valid access token given by the IdM.
Moreover, if the authentication process has succeed, the Accounting Proxy validates the permissions of the user to access to specific service. To do that, it checks if the user has been registered as an admin of the service or if the user has acquired the service.
Is important to notice, that the Business API Ecosystem allows sellers to offer a service in different offerings with different pricing models. In this regard, having just the access token is not enough to determine the accounting unit (pricing model) that has to be used to account the usage of the service. It may happen, that a valid user has acquired the access to a service in two different offerings with two different models (i.e calls and seconds), so the proxy needs extra info to determine the unit to account (in this example calls or seconds). To deal with that problem, the Accounting Proxy generates an API Key which identifies the service, the user, and the accounting unit, so including it in a header X-API-Key: api_key when making requests, enables it to know what unit to account.
Note
The X-API-Key header is not intended to provide an extra level of security, but just to remove the possible incertitude around the request
Proxy API
The Accounting Proxy runs by default in the port 9000; nevertheless, this port can be configured as described in Configuration section. In this regard, the different services configured though the administration cli tool can be accessed directly in the root of the proxy using the public path defined for the service.
In addition, the Accounting Proxy has an administration API which can be accessed though the reserved path /accounting_proxy. Following, you can find the different services exposed in the administration API:
POST …/newBuy
This service is used by the Business API Ecosystem to notify a new buy. If the accounting proxy has been started over HTTPS, these requests should be signed with the Business API Ecosystem key; otherwise, they will be rejected.
{
   "orderId": "...",
   "productId": "...",
   "customer": "...",
   "productSpecification": {
       "url": "...",
       "unit": "...",
       "recordType": "..."
   }
}
- orderId: order identifier.
- productId: product identifier.
- customer: customer id.
- url: base url of the service.
- unit: accounting unit (megabyte, call, etc).
- recordType: type of accounting.
POST …/deleteBuy
This service is used by the Business API Ecosystem to notify a terminated buy. If the accounting proxy has been started over HTTPS, these requests should be signed with the Business API Ecosystem key; otherwise, they will be rejected.
{
   "orderId": "...",
   "productId": "...",
   "customer": "...",
   "productSpecification": {
      "url": "..."
   }
}
- orderId: order identifier.
- productId: product identifier.
- customer: customer id.
- url: base url of the service.
POST …/urls
This service is used by the Business API Ecosystem to check if an URL is a valid registered service. This requests require the “authorization” header with a valid access token from the IdM and the user must be an administrator of the service. If the accounting proxy has been started over HTTPS, these requests should be signed with the Business API Ecosystem key cert; otherwise, they will be rejected.
{
   "url": "..."
}
GET …/keys
Retrieve the user’s API_KEYs in a json. This request require the “authorization” header with a valid access token from the IdM.
[
        {
        "apiKey": "...",
        "productId": "...",
        "orderId": "...",
        "url": "..."
    },
    {
        "apiKey": "...",
        "productId": "...",
        "orderId": "...",
        "url": "..."
    }
]
GET …/units
Retrieve the supported accounting units by the accounting proxy in a JSON. This requests require the “authorization” header with a valid access token from the IdM.
{
        "units": ["..."]
}
Accounting modules
By default, the Accounting Proxy includes three different modules for accounting. Nevertheless, it is possible to extend the proxy with new modules by creating them in the acc_modules directory, those modules have to have the following structure:
/** Accounting module for unit: XXXXXX */

var count = function (countInfo, callback) {
    // Code to do the accounting goes here
    // .....

    return callback(error, amount);
}

var getSpecification = function () {
    return specification;
}
The function count receives two parameters: * countInfo: object containing both, the request made by the user and the response returned by the service
{
    request: { // Request object used by the proxy to make the request to the service.
        headers: {

        },
        body: {

        },
        ...
    },
    response: { // Response object received from the service.
        headers: {

        },
        body: {

        },
        elapsedTime: , // Response time
        ...
    }
}
- callback: function, which is used to retrieve the accounting value or the error message. The callback expects 2 parameters:
- error: string with a description of the error if there is one. Otherwise, null.
- amount: number with the amount to be added to the current accounting.
The function getSpecification should return a javascript object with the usage specification for the accounting unit according to the TMF635 usage management API (TMF635 usage Management API).
Finally, add the name of the developed accounting module to the config.modules array in the config.js file (the accounting module name is the name of the file, e.g. megabyte and megabyte.js) and restart the Accounting Proxy.